Tag Archives: chicken

Stuff it…

It’s funny what subjects get under a persons skin (pun intended), and one of those for me is stuffing.

I love stuffing. As an economical side dish for a deliciously roasted fowl, there isn’t much that can top the humble stuffing.

Unfortunately, it can be fraught with danger.

Cooked inside your bird of choice, you need to over-cook the poultry if you want to cook the stuffing buried deep within the cavity sufficiently to avoid a cross contamination bacterial explosion, and I don’t need to paint that picture for you. The problem with that, is you risk ruining your roast.

So, what is the solution?

Don’t cook your stuffing inside the bird.

Normally, I would cook the stuffing separately in a small roasting dish and serve it with the meal fresh from the oven, however this past Christmas, I had a light bulb moment.

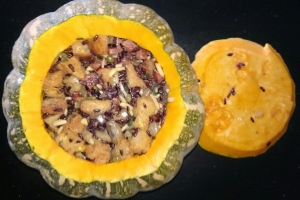
COOK AND SERVE THE STUFFING INSIDE A WHOLE PUMPKIN!

Safer than cooking stuffing in a bird, and easy to turn into a vegetarian delight

Safer than cooking stuffing in a bird, and easy to turn into a vegetarian delight

First, select the pumpkin. I suggest a Kent, or a Jap pumpkin for up to 8 people. Using a sharp thin bladed knife, cut the top off of the pumpkin and mark a notch to help align the lid and base later. Now clean out all of the seeds and fiber…don’t forget the lid. At this time you can choose to scrape flesh out to make more room for stuffing, but don’t make the walls to thin.

Fill with your favorite stuffing, bake, and serve!

What’s that? You don’t have a favorite stuffing recipe?

Well here’s one I prepared earlier…

A good stuffing starts with good bread. Use a nice heavy loaf, like a genuine sourdough or Rye.

Cube it up and toss with oil and salt. I also like to add fresh garlic and fresh rosemary, if I have it on hand.

Cook in a moderate oven until golden brown. congratulations, you just made the best croutons you’ve ever eaten. Put them aside, those you don’t eat immediately anyway, and remember this technique for the next salad you make.

Cook some wild rice, per the directions. You won’t need more than 1/4cup uncooked.

Fry some mushrooms in olive oil, with something porky (chorizo, bacon, etc) and a couple of anchovies. You won’t taste the anchovies, just the seasoning they provide. If you don’t want to, skip it…but add some worcestershire sauce later.

Add some diced onion and garlic, and cook until the onion is translucent. At this point, I also like to add some slivered almonds or Pine nuts.

Add in some rosemary, thyme (not much, it can overpower), and some ground pepper.

Deglaze the pan with a little red wine, Port, or Brandy, and cook it down so there is barely any liquid left.

Now add the rice and mix together.

Take the pan off of the heat, and mix in the croutons.

In another pan, or microwave oven, heat up about half a litre of chicken stock until almost boiling. Pour enough into the mix to make it moist, but not sloppy. Taste and season.

Then bake it in a dish, or a pumpkin like above.

Serve it next to a roast chook or turkey, and lap up the accolades (as well as enjoy the stuffing with the generous scoop of pumpkin).

Fusion Cuisine

Some days I can wander the aisles of a grocery store for ages, trying to get inspiration for the meal ahead, whilst other days I wake up with a meal plan already formed.

Today was the latter, and all day I could not think for the Mexican feast that I had planned for that evenings meal.

Taco’s are a perennial favourite in our household, and tonight would not disappoint.  In addition to the taco’s however, I was fixated on making some enchilada’s.  Whilst the Taco’s were going to be made from minced beef, which is what the kids love most, the enchilada’s were going to be chicken.

With that in mind, I popped into my local butcher to pick up a brace of chicken thighs and minced beef, and while I was there I purchased a couple of legs of lamb for the weekend.  To furnish the rest of the meal, I visited the local mega-mart and tried to get in and out in as little time as possible.

Of course, Coles chose to be less than cooperative.  When making enchilada’s, only corn tortillas hit the spot, and they had none.  There is little more frustrating than being let down by the grocery store when it comes to the sole reason you were visiting in the first place.  Funnily enough, yesterday the item out of stock was milk…of all things.

Steaming, and wanting to dump my groceries and head to the local competitor, I walked past the tortilla’s one more time when the rows of “mountain bread” caught my eye.  Thin square flat breads, made to use as a wrap for all manner of “sandwich” options, I quickly realized the potential when I spotted the corn version.

Enchilasagne was born.

Think lasagne, with alternating layers of chicken with enchilada sauce, and cheese with sour cream.  Each layer separated by a thin square piece of corn flat bread instead of the traditional pasta sheet.

What is your favourite mashup of foods to come up with something unique?

Master stock – Are you ready for the commitment?

There are two things in a kitchen that say “I’m really serious about my cooking”.  One is a well aged sour-dough starter, whilst the other is a master stock.

Both of these things can, and do, last decades, and in some extraordinary circumstances, can be traced back to centuries.  Obviously, through use and replenishment, the origins of the stock or starter are long gone, but history behind these culinary natural wonders show a level of commitment that goes above and beyond what the normal home chef might do these days.

I have been wanting to get both going on my kitchen for quite some time, and thanks to a mid-week discussion at work, today marks the birth of my own master stock. The sour-dough?  Well, that will need to wait for another day.

A master stock is a flavoured broth that is used to poach meat; typically pork, fish or fowl (including chicken, duck, etc).  Originating in Cantonese cuisine, it’s base is usually water, soy sauce, and Shaoxing wine (Chinese rice wine).  To this liquid base, a variety of aromatics and spices can be added, though these usually include: star anise, citrus peel, peppercorns (often Szechuan), cassia bark (cinnamon), ginger, garlic, mushrooms, onions, and/or shallots.

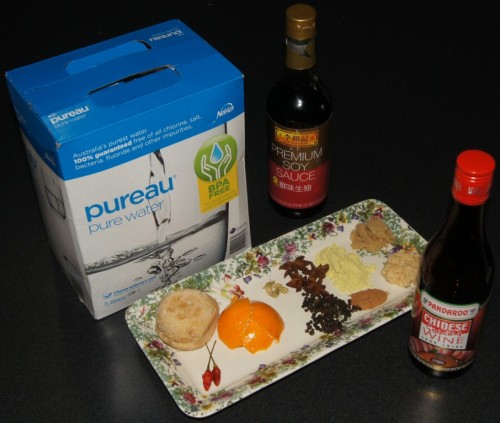
My master stock consists of the following (at least for now):

Simple beginnings – The birth of my Master Stock

Ingredients:

  • 1.5 litres water (purified or filtered)
  • 1 cup Soy Sauce
  • 1 cup Chinese rice wine
  • 150g Palm Sugar
  • Peel from 1/2 mandarine
  • 4 x Star Anise
  • 4 x Cardamom pods
  • 1 Tbsp Garlic
  • 1 Tbsp Ginger
  • 1 Tbsp Chicken stock power (low sodium)
  • 3/4 Tbsp Peppercorns
  • 2 tsp Cinnamon

Method:

Bring all of the ingredients to boil in a large pot.  Reduce the heat and simmer for another 30 minutes.  Store in the fridge or freezer until next use.

Once used, top back up with water and flavourings as you see fit.  Bring back to the boil, and skim off any impurities.  Strain and store as before.

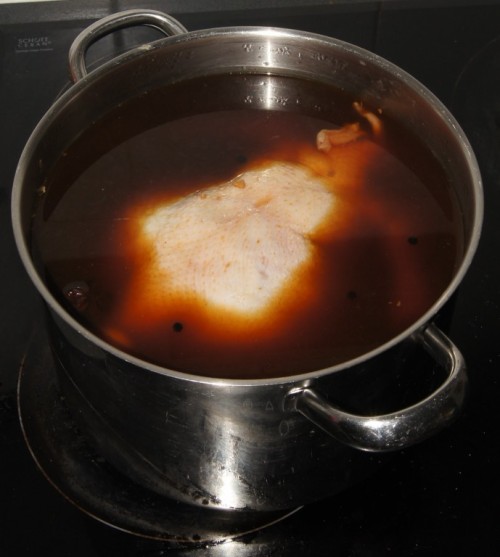
To use a master stock, it is heated in a pot to boiling before the meat is carefully lowered into it.  Then it is brought back to a boil, and then reduced to a simmer until the meat is almost cooked.  The pan is then removed from the heat and the meat allowed to cool in the liquid.  Once the meat has been evacuated, the liquid is returned to the boil, and any impurities skimmed off the top, before it is strained and stored (frozen, usually for home cooks) for use next time.  If needed, the stock can bee topped up with water, or dressed up with more aromatics and spiced, but the usage of the stock over time will gift it a complex flavour that makes each use more sublime than the last.

Keeping a good master stock is an investment, and takes a commitment that goes beyond the world of convenience we currently live in, which is a bit ironic given it is a very simple and quick way to supercharge the flavour in a chicken or slab of pork.  So, take the plunge today and start your own master stock today.  If you get a chance, let me know about your experiences, and what you put in your master stock to add flavour. And sometime in the near future, i’ll let you know how the chicken goes!

Enjoy the meal.

Chicken Lasagne – No boundaries, no borders

There are two schools of thought when it comes to regionalized food.

One school of thought is that you should preserve the recipes and techniques that are synonymous with all of the various regions and cultures found around the world.  That the dish “Spaghetti Bolognese” or “Pot au feu” should be recreated faithfully to the time honoured practices that have made the dish the signature dish of the area in which it was created.  These traditionalists argue that preserving the dish in it’s original form is preserving culture, and that changing it whilst maintaining the name is perpetuating a lie that will ultimately dilute the truth bring about it’s eventual demise.

Pot au feu - photo courtesy of Wikipedia

The other school of thought is that food culture evolves, and through exposure to new ingredients and techniques, tastes and recipes develop to maximize the environment of the day.  Culinary preservation is important to document, as history teaches us a lot about why we are what we are today, but preserving recipes for preservation’s sake is to risk losing potentially new and great dishes solely for stubbornness.

I actually take a very uncontroversial view, and believe that there is room for both.  I think that we should preserve dishes exactly as they have been created for centuries, and the food world should work together to ensure that proprietors and restauranteurs worldwide who carry out these traditions are supported and encouraged to continue through future generations…almost as living museums.  Whilst others use these creations as inspiration to take the dish elsewhere, in new and exciting directions.  All dishes, even the classics above, owe their creation to a single departure from some other dish, so you never know when the new gun Chef is actually creating the classic dish of tomorrow.  Even Lasagne, a dish that can evoke many arguments about how to create the best version, is an evolution of French and Greek recipes, with the catalyst change being the hottest new ingredient in the market place, the tomato (courtesy of Christopher Columbus).

A traditional Lasagne - Photo courtesy of Dee Catering & Logistic Services (Western Australia)

This version of Lasagne was inspired by a meal I had in a Restaurant that actually disappointed me.  I saw “Chicken Lasagne” on the menu, and ordered it, but felt the intensity of the tomato based sauce totally killed the chicken in the dish.  Two days later I created this recipe, or something very much like it (as I did not write the original recipe down, it was more the concept that I am replicating here).  In essence, it’s a blending of a creamy chicken Alfredo or Carbonara, using Lasagne techniques and pasta.  It’s one of those dishes that I make that seems to be an instant hit, yet no one seems to have joined the dots and made a version commercially yet…at least I have never seen one in any Restaurant or cookbook.

Chicken Lasagne with cream, bacon & mushrooms.

I hope you get inspired by it and give it a try.  Again, don’t pay too much attention to the recipe itself, just the idea…and make it your own.  Let me know what you do, and how it turns out.

The ingredients to make the magic happen...

Ingredients

  • 1kg Chicken Thighs (boneless & skinless)
  • 200g Mushrooms (Sliced)
  • 200g Rindless Bacon (Julienned)
  • 1 1/2 Red Onions (finely diced)
  • 2 Tbsp Garlic
  • 1 Tablespoons Olive oil
  • 3/4 Cup White Wine (good enough to drink)
  • Zest from 1/2 Lemon
  • Juice from 1 lemon
  • 2 Tablespoons Butter (3 Tbsp if using fresh or pre-cooked pasta)
  • 2 Tablespoons Flour (3 Tbsp if using fresh or pre-cooked pasta)
  • 1 1/2 Cups Milk or Cream (or blend)
  • 1 1/2 Cups Chicken Stock
  • 1 Cup Sour Cream
  • 1/2 Cup fresh Parsley (finely chopped)
  • 150g Grated Parmesan Cheese
  • 2 Cups grated Mozzarella Cheese
  • Salt/Pepper (freshly ground) to taste
  • Lasagne Sheets (fresh or dried)

Cut the chicken thighs into large cubes and add half to a food processor.  Pulse for 10 x 1-second pulses, then 1 x 4-second pulse (full seconds…one-one thousand, two-one thousand, etc).  Turn out into a bowl, and repeat with the other half.  You can use chicken mince instead, if you want, the result will be more consistent.  You can also use breasts, which will actually whiten up the dish a lot, as thighs tend to be a bit grey.  I like the flavour of thighs though, so I tend to use them a lot.

Add oil to a large frying pan and add the bacon.  Cook until almost crispy over a medium heat, stirring often.  Using a slotted spoon, remove the bacon to a bowl, and reserve.

Delicious rendered bacon

Add a quarter of the chicken to the bacon grease, and cook until almost done, trying not to brown the chicken at all.  Clear the centre of the pan by moving the cooked chicken to the sides, and add the next quarter.  Repeat until all of the chicken is cooked.  Using the slotted spoon, remove the cooked chicken to the bacon bowl, and reserve.

Move the cooked chicken to the edge, and add the next batch in the centre.

Add the onions and mushrooms and garlic, with a pinch of salt, and cook slowly until the onions are just translucent.  You don’t want any browning as it will colour the dish.

De-glaze the pan with the white wine and lemon juice, and cook until almost evaporated.

Notice the base of the pan where I moved a spoon through the mix. When the liquid takes a while to fill the path made by the spoon, you've reduced enough.

Add the chicken and bacon mix, and stir to combine, then set aside.

Combine the chicken stock and milk in a microwave proof container, and cook on high for 3 minutes.  If it is not yet steaming, cook for 1 minute bursts until it is.  Careful not to boil the liquid, however.  Add the butter to a sauce-pan and cook until fragrant.

Liquid gold

Add the flour to the butter, and stir until all lumps are gone.  Cook for 1 minute and then add the hot milk/stock mix, stirring constantly until thickened (about the consistency of cream).  Remove from heat and add the Parmesan cheese.  Stir until all of the cheese is melted, the add the sour cream and stir until is well combined.

Added the Parmesan Cheese to the sauce...

Add the cream sauce to the chicken mix, and stir to combine.  Taste, and season with salt and pepper to taste.  Stir in the chopped parsley, and set aside.

Everyone in the pool! Now just the layers...

In a bowl, mix the Mozzarella cheese with the lemon zest.

Preheat the oven to 180C (350f).

At this point, we consider the pasta.  I just use bought dry pasta sheets, and place layer them as is.  I do not pre-cook them, and I try not to buy “Instant” either, as they are usually thinner.  If you are using fresh, or precooked, get them ready now, and hopefully you used the higher quantity of flour and butter (for a thicker sauce).

In a high sided baking dish, spread a thin layer of the chicken mixture, just enough so that you cant see the bottom of the baking dish.  Top with a sprinkling of the Mozzarella.  Layer the pasta sheets on top, without overlapping them.  Repeat this layering until you reach the top of the pan, at which point you do not add a layer of pasta on top of the cheese.

Just to show the layering of the sauce and cheese with the pasta.

Cover the lasagne with foil, and bake for 45 minutes (30 minutes for fresh or pre-cooked pasta sheets).  Then uncover, and bake for 15 minutes more.

Just out of the oven...now the wait.

It is important that you let the Lasagne cool before you cut into it.  You really want to let it sit, covered loosely with foil, for 90 minutes before serving…if you can.  Good luck with that.

Serve with a side of steamed broccoli, and maybe a nice bruschetta. Oh, and a glass of the white wine you used in the dish.

Again, let me know if this dish inspires you, and share with us all where you take it in your kitchen.

Enjoy the meal!

Fried Chicken – A Family Favourite

Who doesn’t enjoy Fried Chicken!  If there’s a more popular comfort food in the Western World, I surely haven’t heard of it.  Chicken lends itself to so many flavours, that the options for a good Fried Chicken can be endless.

Please feel free to change any of the quantities of herbs and spices I have included in my recipe, and even substitute them out if you want.  I’ll give some of the more popular options I enjoy, and you can come up with your own secret recipe of herbs and spices.

Even assign yourself the rank of General if you want.  A General outranks a Colonel, and your chicken will outrank the Colonels offerings.

One of the great things about Fried Chicken is that it’s cheap.  Regardless of your budget, most people can afford to make it, and make it well.  That being said, if you want the best results, you really should buy a Free Range whole bird, and segment it yourself.  Sure, you might have just doubled the price of the meal, but the results are that much better.

If it helps, think of the additional price as a bit of an Animal Welfare Tax.  Yes, you’ve paid a premium for your poultry, but the knowledge that the chicken had a happy existence prior to being humanely dispatched is something we should all be a bit more attuned to.  In addition, you’ll have a few wing tips and cages to use for that Chicken Stock you’re going to make one day…but that’s a different blog.

If segmenting a chicken is something you haven’t done, fear not.  There are thousands of DIY videos online to help you.  It’s not that difficult, and once you’ve done it a couple of times, you’ll be able to impress all of your friends and do it in front of them in just a minute or so.

Start with 2 whole chickens, and segment them into wings (minus the tips), legs, thighs, and breasts.  Cut the breasts in half to make 2 chunks.  In all, you should have 10 pieces per bird, or 20 pieces overall.  If there are only 2 of you eating, do 2 chickens.  It’s not much harder to do than 1, and the leftover chicken later is divine.  If you are watching your caloric intake, remove the skin…but i wouldn’t.

You’ll need:
2 Chickens
Herbs and Spices (see below)
Buttermilk*
2 eggs – optional step
1 cup chicken stock – optional step
Plain Flour, or Wholemeal Flour (which is what I use)
1/2 Cup LSA* – optional
Heavy pot, cast iron is best
Enough cooking oil (peanut or canola) to cover half up the chicken pieces.

*About the Buttermilk.  If you can’t get it, or don’t have it, add 3 Tbsp white vinegar to 3 cups milk.  Stir and let sit for 10 minutes before using.  Another option, which works great for this recipe, is to add 2 Tbsp white vinegar and 1/2 cup white wine to 2 1/2 cups milk.

*About the LSA.  It’s a mix of ground Linseed, Sunflower seeds, and Almonds.  Do not use if there is a chance someone with a nut allergy will eat the chicken.  It will impart a great flavour, with it’s nuttiness, and is jam packed with nutrients.  Do a search online for LSA and be amazed.  You just might want to add it to everything.

Using a spice grinder (aka coffee grinder), blitz the following until a fine powder is achieved:

1 Tbsp Salt (coarse cooking salt, or kosher salt)
2 tsp Peppercorns (whole)
1 tsp dried Sage
1 tsp dried Rosemary
2tsp dried Chilli’s (red pepper flakes are OK)
1 Tbsp Paprika (smoked is best)

Options:
Instead of the Rosemary, add 1/2 tsp Cumin seeds, 1 tsp dried Oregano (and add 1/2 tsp cayenne for that Jamaican Jerk punch)
Instead of the Sage and Rosemary, add Coriander seeds and Chinese 5 spice

In a bowl, or large baking dish, place the chicken and add the ground spice mix tossing to mix.  Let sit about 10 minutes then add about 3 cups buttermilk (or buttermilk mix).  Toss together and rest in a fridge for at least 6 hours, preferably overnight.  I usually add it all to a ziplock bag, and evacuate the air so the chicken maintains contact with the buttermilk at all times.

When ready to cook, remove chicken from the bag and place on a wire rack, above a tray to catch the drips.  If you are going to double dip the chicken in flour, for an extra thick crunchy coating, add the leftover buttermilk mix to a bowl, and beat in 2 eggs and the chicken stock.

In another bowl, add the flour, LSA, and the following:
2 tsp Garlic powder (not garlic salt, and not granules)
2 tsp Onion powder (not granules)
1 Tbsp salt (normal kitchen salt is fine)
1 tsp ground Pepper
1 Tbsp Paprika (smoked is best)
1 tsp ground Cayenne pepper (more or less to taste)
I would not add herbs here at all as they will be on the outside of the food and will burn in the oil.  Burnt herbs are not good herbs.

Single dip method:
Dredge the chicken in the flour, making sure to get good coverage.  Shake off the excess and place on another wire rack.

Double dip method:
Dredge the chicken in the flour, making sure to get good coverage, then dip in the buttermilk mix.  Repeat the dredge, and shake off the excess before placing on a wire rack.

Buried method (thanks to Steve Murray, from beautiful Bellingham in Washington State):
After the 6 hour soak in the marinade, dredge the chicken pieces in the flour, and then bury the pieces in the flour container overnight.  To do this, you will need to double the flour recipe.  On the plus side, use the remaining flour to make “Hush Puppies”, which are basically a golden fried corn meal dumpling (and a culinary institution in the deep South of the US).

Tip:  Use one hand for wet work (wet chicken and buttermilk), and one for dry work (flour).  This way you don’t end up with battered hands.

Place the heavy pan on a medium high heat, and heat the oil to 180 degrees Celsius (350f).  The reason we don’t preheat, is because we want the chicken to sit for a bit after the dredge.  You will see the flour become a batter.  This is a good thing.

Carefully place the pieces in the pan, being careful not to crowd it.  You want good space between the pieces, and you want the pan to remain fairly hot.  To much chicken in at once will cool the oil too much, and the chicken will take too long to cook (or be undercooked) and will become greasy.  Once nice and brown, turn and cook the other side.

When the pieces are cooked, place them on a wire rack, and into a warmed oven.  Do not season them until just before serving.

When all pieces are cooked, sprinkle a little salt on them, and serve.  Great with a home made macaroni and cheese, or a nice tossed salad.  But the very best way to eat, is cooled to room temperature with a bottle of chilled white, at your local moonlight outdoor theatre or favourite picnic spot.

Oh, if you try the Chinese variety (coriander and 5 spice), serve with a 50/50 mix of hoisin and sweet chilli sauce…delicious.

Bon appetite.